Pod的钩子和探针
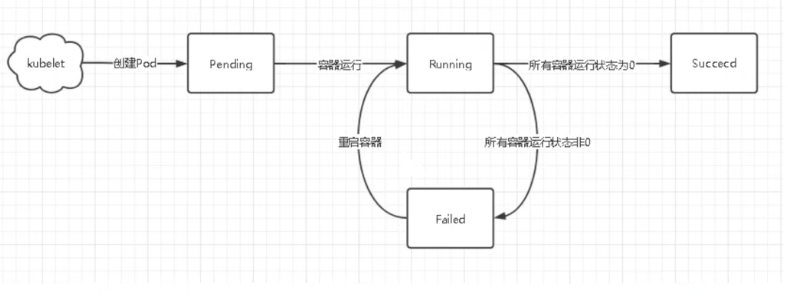
1、pod的生命周期
1
2
3
4
5
6
7
8
9
10
11
12
13
14
15
16
17
18
19
20
21
22
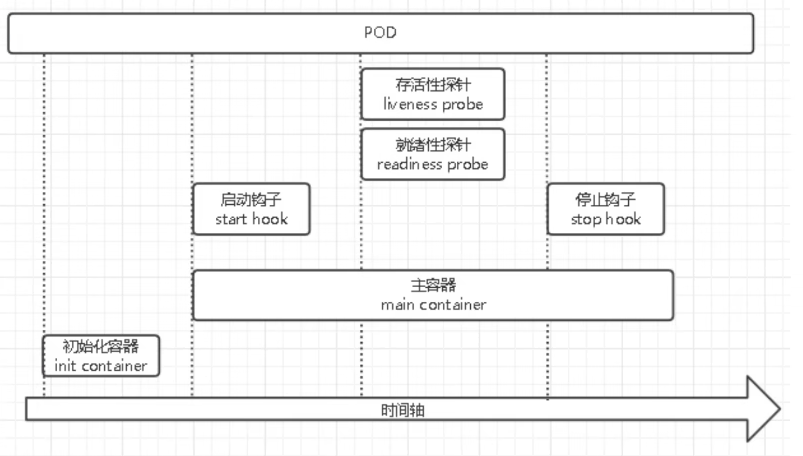
生命周期里面包含的东西 1、初始化容器 2、2个钩子 - start hook - stop hook 初始化容器的作用:主容器启动之前,可以让他做一些准备工作。 比如: 1、创建用户,容器的统一用户 2、2个容器做了共享储存,那么我们可以让他先启动一个容器,来对目录进行更改和授权 3、容器需要连接数据库,可以让初始化容器检测数据库是否可以正常连接,如果可以再启动主容器 Poststart:在容器创建后,立即执行,但时间不能太久,否则容器不会是running状态 Prestart:在容器停止前,执行一些命令,主要用于优雅关闭进程 存活探针,用于定义容器内,应用是否满足探针状态 就绪探针,指定何时允许容器进入流量
2、初始化容器
1 2 3 4 5 6 7 8 9 10 11 12 13 14 15 16 17 18 19 20 21 22 23 24 25 26 27 28 29 30 31 32 33 34 35 36 37 38 39 40 41 42 43 44 45 46 47 48 49 50 51 52 53 54 55 56 57 58 59 60 61 1、编写资源清单 [root@master01 kubernetes]# vim init-container.yml apiVersion: v1 kind: Pod metadata: name: init-pod namespace: default labels: app: nginx spec: volumes: - name: nginx-data emptyDir: {} initContainers: - name: initcontainer image: centos:7 imagePullPolicy: IfNotPresent command : ["/bin/sh" ,"-c" ,"echo 'test k8s 初始化容器' > /usr/share/nginx/html/index.html" ] volumeMounts: - name: nginx-data mountPath: /usr/share/nginx/html containers: - name: nginx-container image: nginx:alpine imagePullPolicy: IfNotPresent volumeMounts: - name: nginx-data mountPath: /usr/share/nginx/html - name: c7-container image: centos:7 imagePullPolicy: IfNotPresent command : ["/bin/sh" ,"-c" ,"tail -f /etc/hosts" ] volumeMounts: - name: nginx-data mountPath: /usr/share/nginx/html 2、运行容器,查看 [root@master01 kubernetes]# kubectl apply -f init-container.yml [root@master01 kubernetes]# kubectl get pod -owide NAME READY STATUS RESTARTS AGE IP NODE init-pod 2/2 Running 0 2m1s 10.2.2.6 node02 [root@master01 kubernetes]# curl 10.2.2.6 test k8s 初始化容器[root@master01 kubernetes]# kubectl exec -it init-pod -c c7-container -- /bin/bash [root@init-pod /]# cat /usr/share/nginx/html/index.html test k8s 初始化容器现在相当于3个容器同时挂载在同一个目录下,同时也相当于挂载到宿主机的一个临时目录,他们3的目录做了共享 比如说起个nginx和php容器,容器的文件互相隔离,代码就不共享,那代码部署在哪里呢,如果部署在nginx上,php才是解析代码的,wordpress不是前后端分离的,nginx配置文件就不能用socket连接php了,要用fastcgi_pass xx.xx.xx.xx:900,代码必须2边都要存
3、钩子
1 2 3 4 5 6 7 8 9 10 11 12 13 14 15 16 17 lifecycle: preStart: exec : httpGet: tcpSocket exec :执行命令httpGet:检测HTTP,比如检测网站的80,443端口,要求web页面状态码返回是不是404,200,一般在探针里用 tcpSocket:检测端口通不通,比如检测数据库是否正常运行,如果用httpget不行 lifecycle: preStop: exec : httpGet: tcpSocket
1
2
3
4
5
6
7
8
9
10
11
12
13
14
15
16
17
18
19
20
21
22
23
24
25
26
27
28
29
30
31
32
33
34
35
36
37
38
39
40
41
42
43
44
45
46
47
48
49
50
51
52
53
54
55
56
57
58
59
60
61
62
63
64
65
66
67
68
69
70
1、编写资源清单 [root@master01 kubernetes]# cp init-container.yml poststart.yml [root@master01 kubernetes]# vim poststart.yml apiVersion: v1 kind: Pod metadata: name: poststart-pod namespace: default labels: app: nginx spec: volumes: - name: nginx-data emptyDir: {} initContainers: - name: initcontainer image: centos:7 imagePullPolicy: IfNotPresent command : ["/bin/sh" ,"-c" ,"echo 'test k8s 使用启动钩子在一个pod里统一多个容器的用户' > /usr/share/nginx/html/index.html" ] volumeMounts: - name: nginx-data mountPath: /usr/share/nginx/html containers: - name: nginx-container image: nginx:alpine imagePullPolicy: IfNotPresent lifecycle: postStart: exec : command : ["/bin/sh" ,"-c" ,"echo 'www:x:666' >> /etc/group && echo 'www:x:666:666::/home/www:/sbin/nologin' >> /etc/passwd" ] volumeMounts: - name: nginx-data mountPath: /usr/share/nginx/html - name: c7-container image: centos:7 imagePullPolicy: IfNotPresent command : ["/bin/sh" ,"-c" ,"tail -f /etc/hosts" ] lifecycle: postStart: exec : command : ["/bin/sh" ,"-c" ,"groupadd www -g 666 && useradd www -u 666 -g 666 -s /sbin/nologin -M" ] volumeMounts: - name: nginx-data mountPath: /usr/share/nginx/html 2、运行容器,查看 [root@master01 kubernetes]# kubectl apply -f poststart.yml pod/poststart-pod created [root@master01 kubernetes]# kubectl get pod poststart-pod -owide NAME READY STATUS RESTARTS AGE IP NODE poststart-pod 2/2 Running 0 33s 10.2.3.33 node03 [root@master01 kubernetes]# curl 10.2.3.33 test k8s 使用启动钩子在一个pod里统一多个容器的用户[root@master01 kubernetes]# kubectl exec -it poststart-pod -c c7-container -- /bin/bash [root@poststart-pod /]# id www uid=666(www) gid=666(www) groups =666(www) [root@master01 kubernetes]# kubectl exec -it poststart-pod -c nginx-container -- /bin/sh / uid=666(www) gid=666 groups =666
停止钩子 容器停止之前打印指定内容到文件 (不常用,没什么应用场景)
1
2
3
4
5
6
7
8
9
10
11
12
13
14
15
16
17
18
19
20
21
22
23
24
25
26
27
28
29
30
31
32
33
34
35
36
37
38
39
40
41
42
43
44
45
46
47
48
49
50
51
52
53
54
55
56
57
58
59
60
61
62
63
64
65
66
67
68
69
1、编写资源清单 [root@master01 kubernetes]# cp poststart.yml poststop.yml [root@master01 kubernetes]# vim prestop.yml apiVersion: v1 kind: Pod metadata: name: poststop-pod namespace: default labels: app: nginx spec: volumes: - name: nginx-data hostPath: path: /data/nginx initContainers: - name: initcontainer image: centos:7 imagePullPolicy: IfNotPresent command : ["/bin/sh" ,"-c" ,"echo 'test k8s 使用启动钩子在一个pod里统一多个容器的用户' > /usr/share/nginx/html/index.html" ] volumeMounts: - name: nginx-data mountPath: /usr/share/nginx/html containers: - name: nginx-container image: nginx:alpine imagePullPolicy: IfNotPresent lifecycle: postStart: exec : command : ["/bin/sh" ,"-c" ,"echo 'www:x:666' >> /etc/group && echo 'www:x:666:666::/home/www:/sbin/nologin' >> /etc/passwd" ] preStop: exec : command : ["/bin/sh" ,"-c" ,"echo 'test k8s 使用停止钩子使pod在停止之前打印 bye' > /usr/share/nginx/html/index.html" ] volumeMounts: - name: nginx-data mountPath: /usr/share/nginx/html - name: c7-container image: centos:7 imagePullPolicy: IfNotPresent command : ["/bin/sh" ,"-c" ,"tail -f /etc/hosts" ] lifecycle: postStart: exec : command : ["/bin/sh" ,"-c" ,"groupadd www -g 666 && useradd www -u 666 -g 666 -s /sbin/nologin -M" ] volumeMounts: - name: nginx-data mountPath: /usr/share/nginx/html 2、查看 [root@node03 ~]# rm -rf /data/nginx/index.html [root@master01 kubernetes]# kubectl get pod poststop-pod -owide NAME READY STATUS RESTARTS AGE IP NODE poststop-pod 2/2 Running 0 40s 10.2.3.34 node03 [root@master01 kubernetes]# curl 10.2.3.34 test k8s 使用启动钩子在一个pod里统一多个容器的用户3、现在curl出来的结果还没有改变,需要删除这个pod,才会发生改变,删掉之后容器不在了,不能用curl,只能到挂载目录去看 [root@master01 kubernetes]# kubectl delete pod poststop-pod [root@node03 ~]# cat /data/nginx/index.html test k8s 使用停止钩子使pod在停止之前打印 bye
4、探针
1 2 3 4 5 6 7 8 9 10 11 12 13 14 15 16 17 18 19 列如: 当nginx容器起来后,即便页面是404,容器会正常运行,80端口也会正常存在,k8s就不会做到重新拉起这个容器,存活性探针 数据库假死,进程存在,存活性探针就可以检测应用是否存活,不存活会出现拉起新的pod 用于定义容器内,应用是否满足探针指定状态,如果不满足,则删除POD重新拉起一个新的POD 存活探针简单来说就是用来检测容器的应用程序是否还正常工作,如果应用程序不正常,即使容器还活着也没有意义了,所以这时候就可以使用存活探针来探测,如果应用程序不正常,就重启POD。 exec :执行命令httpGet:检测HTTP tcpSocket:检测端口 ivenessProbe: httpGet: path: port: initialDelaySeconds: 3 periodSeconds: 3
1、存活性探针 exec版 应用场景:比如说nfs,没有页面和端口,就可以用命令,df -Th|grep 挂载目录,如果nfs挂了df -Th会卡主,但是他有一个超时时间,卡住了,到时候超时了就认为挂了
1
2
3
4
5
6
7
8
9
10
11
12
13
14
15
16
17
18
19
20
21
22
23
24
25
26
27
28
29
30
31
32
33
34
35
36
37
38
39
40
41
42
43
44
45
46
47
48
49
50
51
52
53
54
55
56
57
58
59
60
61
62
63
64
65
66
67
68
69
70
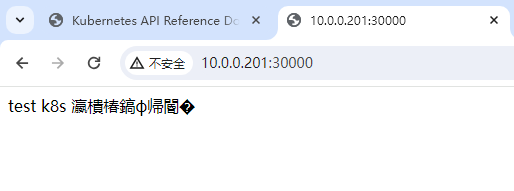
exec 还可以写脚本去检测某个服务1、写service资源清单 [root@master01 kubernetes]# vim ivenssprobe-service.yml apiVersion: v1 kind: Service metadata: name: ivenssprobe-service namespace: default spec: selector: app: ivenssprobe ports: - name: http port: 80 protocol: TCP targetPort: 80 nodePort: 30000 type : NodePort 2、编写资源清单 到这里目前还没有添加存活探针的功能,在后面添加 [root@master01 kubernetes]# vim ivenssprobe.yml apiVersion: v1 kind: Pod metadata: name: ivenssprobe-pod namespace: default labels: app: ivenssprobe spec: volumes: - name: nginx-data hostPath: path: /data/nginx containers: - name: nginx-container image: nginx:alpine imagePullPolicy: IfNotPresent lifecycle: postStart: exec : command : ["/bin/sh" ,"-c" ,"echo 'test k8s 存活性探针' > /usr/share/nginx/html/index.html" ] volumeMounts: - name: nginx-data mountPath: /usr/share/nginx/html 2、运行 [root@master01 kubernetes]# kubectl get service NAME TYPE CLUSTER-IP EXTERNAL-IP PORT(S) AGE ivenssprobe-service NodePort 10.1.87.209 <none> 80:30000/TCP 25s kubernetes ClusterIP 10.1.0.1 <none> 443/TCP 7d5h [root@master01 kubernetes]# kubectl get pod ivenssprobe-pod -owide NAME READY STATUS RESTARTS AGE IP NODE ivenssprobe-pod 1/1 Running 0 3m53s 10.2.1.11 node01 3、检查 ivenssprobe-service这个资源相当于给他们做了负载均衡 [root@master01 kubernetes]# curl 10.1.151.36 test k8s 存活性探针[root@master01 kubernetes]# curl 10.2.1.7 test k8s 存活性探针[root@node01 ~]# cat /data/nginx/index.html test k8s 存活性探针由于做了宿主机上的映射,可以浏览器访问 10.0.0.201:30000
测试探针
1
2
3
4
5
6
7
[root@node01 ~]# cat /data/nginx/index.html test k8s 存活性探针1、删除主页面,再次浏览器访问,变成403 [root@node01 ~]# rm -rf /data 2、再次查看主页面,还是空的,查看pod,还是running状态,没有任何问题,但网站确实挂了,pod虽然在运行,但是没啥用了,还占用资源
在资源清单编写存活性探针的检验功能
1
2
3
4
5
6
7
8
9
10
11
12
13
14
15
16
17
18
19
20
21
22
23
24
25
26
27
28
29
30
31
32
33
34
35
36
37
38
39
40
41
42
43
44
45
46
47
48
49
50
1、删除旧的pod [root@master01 kubernetes]# kubectl delete pod ivenssprobe-pod 2、在资源清单添加存活性探针的检验功能 [root@master01 kubernetes]# vim ivenssprobe.yml apiVersion: v1 kind: Pod metadata: name: ivenssprobe-pod namespace: default labels: app: ivenssprobe spec: volumes: - name: nginx-data hostPath: path: /data/nginx containers: - name: nginx-container image: nginx:alpine imagePullPolicy: IfNotPresent lifecycle: postStart: exec : command : ["/bin/sh" ,"-c" ,"echo 'test k8s 存活性探针' > /usr/share/nginx/html/index.html" ] livenessProbe: exec : command : ["/bin/sh" ,"-c" ,"cat /usr/share/nginx/html/index.html" ] initialDelaySeconds: 3 periodSeconds: 2 timeoutSeconds: 1 failureThreshold: 3 volumeMounts: - name: nginx-data mountPath: /usr/share/nginx/html 3、查看 [root@master01 kubernetes]# kubectl apply -f ivenssprobe.yml pod/ivenssprobe-pod created [root@master01 kubernetes]# kubectl get pod ivenssprobe-pod -owide NAME READY STATUS RESTARTS AGE IP NODE ivenssprobe-pod 1/1 Running 0 64s 10.2.1.12 node01
1
2
3
4
5
6
7
参数解释: initialDelaySeconds: periodSeconds: timeoutSeconds: successThreshold: failureThreshold:
再次测试 访问网页 10.0.0.201:30000 恢复正常
1
2
3
4
5
6
7
8
9
10
11
12
13
14
15
16
[root@node01 ~]# cat /data/nginx/index.html test k8s 存活性探针[root@node01 ~]# rm -rf /data [root@node01 ~]# cat /data/nginx/index.html test k8s 存活性探针[root@node01 ~]# rm -rf /data [root@node01 ~]# cat /data/nginx/index.html cat : /data/nginx/index.html: No such file or directory[root@node01 ~]# cat /data/nginx/index.html cat : /data/nginx/index.html: No such file or directory[root@node01 ~]# cat /data/nginx/index.html test k8s 存活性探针删掉主页面,查看主页面内容,会重新拉起,所以会看到内容 但是exec 有缺陷,以后代码页面多,不能cat ,所以Httpget比较好用
1
2
3
4
5
6
7
8
9
10
11
12
13
14
15
16
17
18
19
20
21
22
23
24
25
26
27
28
29
30
31
32
33
34
35
36
37
38
39
40
41
42
43
44
45
46
47
48
49
50
51
52
53
54
55
56
57
58
59
60
61
62
63
64
65
66
67
68
69
70
71
72
73
74
1、删除旧的pod [root@master01 kubernetes]# kubectl delete pod ivenssprobe-pod 2、在资源清单添加存活性探针的检验功能 [root@master01 kubernetes]# vim ivenssprobe.yml apiVersion: v1 kind: Pod metadata: name: ivenssprobe-pod namespace: default labels: app: ivenssprobe spec: volumes: - name: nginx-data hostPath: path: /data/nginx containers: - name: nginx-container image: nginx:alpine imagePullPolicy: IfNotPresent lifecycle: postStart: exec : command : ["/bin/sh" ,"-c" ,"echo 'test k8s 存活性探针' > /usr/share/nginx/html/index.html" ] livenessProbe: httpGet: path: / port: 80 initialDelaySeconds: 3 periodSeconds: 2 timeoutSeconds: 1 failureThreshold: 3 volumeMounts: - name: nginx-data mountPath: /usr/share/nginx/html ---------------------- 不写host是因为不知道pod起来是什么ip,但以后得写,以后不可能吧nginx和mysql起在一个pod,数据库肯定要单独起一个pod 3、查询 [root@master01 kubernetes]# kubectl delete pod ivenssprobe-pod pod "ivenssprobe-pod" deleted [root@master01 kubernetes]# kubectl apply -f ivenssprobe.yml pod/ivenssprobe-pod created [root@master01 kubernetes]# kubectl get pod ivenssprobe-pod -owide NAME READY STATUS RESTARTS AGE IP NODE ivenssprobe-pod 1/1 Running 0 26s 10.2.1.13 node01 4、#测试 到node01删除主页文件 [root@node01 ~]# rm -rf /data 速度快点,切换到浏览器网站,会看到403,一直刷新,网站就会恢复原样,不需要去cat 主页文件了 查看主页文件,恢复原样 [root@node01 ~]# cat /data/nginx/index.html test k8s 存活性探针
3、存活性探针 tcpSocket版 应用场景:比如说数据库,只有端口,没有网站
1
2
3
4
5
6
7
8
9
10
11
12
13
14
15
16
17
18
19
20
21
22
23
24
25
26
27
28
29
30
31
32
33
34
35
36
37
38
39
40
41
42
43
44
45
46
47
48
49
50
51
52
53
54
55
56
57
58
59
60
只能检测端口,不会检测页面,删掉页面,没有用,不会重新拉起,httpGet就相当于底层使用curl命令去检测 tcpSocket: host: port: 1、在资源清单添加存活性探针的检验功能 [root@master01 kubernetes]# vim ivenssprobe.yml apiVersion: v1 kind: Pod metadata: name: ivenssprobe-pod namespace: default labels: app: ivenssprobe spec: volumes: - name: nginx-data hostPath: path: /data/nginx containers: - name: nginx-container image: nginx:alpine imagePullPolicy: IfNotPresent lifecycle: postStart: exec : command : ["/bin/sh" ,"-c" ,"echo 'test k8s 存活性探针' > /usr/share/nginx/html/index.html" ] livenessProbe: tcpSocket: port: 80 initialDelaySeconds: 3 periodSeconds: 2 timeoutSeconds: 1 failureThreshold: 3 volumeMounts: - name: nginx-data mountPath: /usr/share/nginx/html 2、删除旧pod,运行新pod [root@master01 kubernetes]# kubectl delete pod ivenssprobe-pod && kubectl apply -f ivenssprobe.yml pod "ivenssprobe-pod" deleted pod/ivenssprobe-pod created [root@master01 kubernetes]# kubectl get pod ivenssprobe-pod -owide NAME READY STATUS RESTARTS AGE IP NODE ivenssprobe-pod 1/1 Running 0 8m58s 10.2.1.14 node01 3、连接进入容器,断开端口 [root@master01 kubernetes]# kubectl exec -it ivenssprobe-pod -c nginx-container -- /bin/sh / 执行之后容器会自动退出,因为存活性探针检测到端口不见了,把就容器删除,就会被强制踢出来
2、就绪性探针
1 2 3 4 5 6 7 就绪性探针配置语法和存活探针基本一样 有时候我们Pod本身已经起来了,但是pod的容器还没有完全准备好对外提供服务,那么这时候流量进来就会造成请求失败的情况出现,针对这种情况k8s有一种探针叫就绪探针,他的作用就是让k8s知道你的Pod内应用是否准备好为请求提供服务。只有就绪探针ok了才会把流量转发到pod上。 应用场景:比如说数据库需要初始化,初始化的时候速度比较慢,nginx容器起来的速度快,但是数据库没起来,访问肯定是502,就好比gitlab,nginx起来了,组件没起来,访问显示502,就绪探针就是等数据起来,才对外提供服务(就是浏览器正常访问) 但是想要检测,就要用到service资源
编写资源清单:需求
nginx的pod启动,前提条件是数据库pod也启动起来,并且数据库已初始化完了,然后再对外提供服务
1
2
3
4
5
6
7
8
9
10
11
12
13
14
15
16
17
18
19
20
21
22
23
24
25
26
27
28
29
30
31
32
33
34
35
36
37
38
39
40
41
42
43
44
45
46
47
48
49
50
51
52
53
54
55
56
57
58
59
60
61
62
63
64
65
66
67
68
69
70
71
72
73
74
75
76
77
78
79
80
81
82
83
84
85
86
87
88
89
1、编写资源清单 [root@master01 kubernetes]# vim readnessprobe.yml apiVersion: v1 kind: Pod metadata: name: readnessprobe-pod namespace: default labels: app: readnessprobe spec: volumes: - name: nginx-data hostPath: path: /data/nginx containers: - name: nginx-container image: nginx:alpine imagePullPolicy: IfNotPresent lifecycle: postStart: exec : command : ["/bin/sh" ,"-c" ,"echo 'test k8s 就绪性探针readnessprobe' > /usr/share/nginx/html/index.html" ] livenessProbe: httpGet: path: / port: 80 readinessProbe: exec : command : ["/bin/sh" ,"-c" ,"cat /usr/share/nginx/html/healthy.html" ] initialDelaySeconds: 3 periodSeconds: 2 timeoutSeconds: 1 failureThreshold: 3 volumeMounts: - name: nginx-data mountPath: /usr/share/nginx/html 但是现在没有/usr/share/nginx/html/healthy.html这个文件,那容器肯定是一直不就绪的 2、删除旧pod,创建新pod [root@master01 kubernetes]# kubectl delete pod ivenssprobe-pod [root@master01 kubernetes]# kubectl apply -f readnessprobe.yml pod/readnessprobe-pod created [root@master01 kubernetes]# kubectl get pod readnessprobe-pod -owide NAME READY STATUS RESTARTS AGE IP NODE readnessprobe-pod 0/1 Running 0 69s 10.2.1.15 node01 READY一直显示0/1,一直不就绪,就不对外提供流量,不对外提供流量,但是页面可以访问 [root@master01 kubernetes]# curl 10.2.1.15 test k8s 就绪性探针readnessprobe3、编写service资源清单 [root@master01 kubernetes]# cp ivenssprobe-service.yml readnessprobe-service.yml [root@master01 kubernetes]# vim readnessprobe-service.yml apiVersion: v1 kind: Service metadata: name: readnessprobe-service namespace: default spec: selector: app: readnessprobe ports: - name: http port: 80 protocol: TCP targetPort: 80 nodePort: 30001 type : NodePort 4、启动并查看 [root@master01 kubernetes]# kubectl apply -f readnessprobe-service.yml service/readnessprobe-service created [root@master01 kubernetes]# kubectl get svc NAME TYPE CLUSTER-IP EXTERNAL-IP PORT(S) AGE kubernetes ClusterIP 10.1.0.1 <none> 443/TCP 7d9h readnessprobe-service NodePort 10.1.234.20 <none> 80:30001/TCP 17s
测试
1
2
3
4
5
6
7
8
9
10
11
12
13
14
15
16
1、测试curl [root@master01 kubernetes]# curl 10.1.234.20 curl: (7) Failed connect to 10.1.234.20:80; Connection refused 没有结果,因为就绪探针没有就绪 2、在node节点映射的宿主机目录创建就绪文件 [root@node01 ~]# touch /data/nginx/healthy.html 3、到master查看就绪状态,已经变成就绪完成 [root@master01 kubernetes]# kubectl get pod readnessprobe-pod -owide NAME READY STATUS RESTARTS AGE IP NODE readnessprobe-pod 1/1 Running 0 16m 10.2.1.15 node01 [root@master01 kubernetes]# curl 10.1.234.20 test k8s 就绪性探针readnessprobe4、检查已经对外提供服务了
1
2
3
4
5
6
7
8
9
10
11
12
5、删除就绪文件,curl失败,未就绪,网站无法访问 [root@node01 ~]# rm -rf /data/nginx/healthy.html [root@master01 kubernetes]# curl 10.1.234.20 curl: (7) Failed connect to 10.1.234.20:80; Connection refused [root@master01 kubernetes]# kubectl get pod readnessprobe-pod -owide pod的ip可以通,代表对内提供服务 [root@master01 kubernetes]# curl 10.2.1.15 test k8s 就绪性探针readnessprobe如上是就绪探针的使用方法,但是正常不会这样子做,就像起wp,就要检测数据库有没有准备好
nginx和mysql,检测mysql是否就绪,就像就对外提供服务
1
2
3
4
5
6
7
8
9
10
11
12
13
14
15
16
17
18
19
20
21
22
23
24
25
26
27
28
29
30
31
32
33
34
35
36
37
38
39
40
41
42
43
44
45
46
47
48
49
50
51
52
53
54
55
56
57
58
59
60
61
62
63
64
65
66
67
68
69
70
71
72
73
74
75
76
[root@master01 kubernetes]# vim readness-mysql.yml apiVersion: v1 kind: Pod metadata: name: readnessprobe-pod namespace: default labels: app: readnessprobe spec: volumes: - name: nginx-data hostPath: path: /data/nginx containers: - name: nginx-container image: nginx:alpine imagePullPolicy: IfNotPresent lifecycle: postStart: exec : command : ["/bin/sh" ,"-c" ,"echo 'test k8s 就绪性探针readnessprobe' > /usr/share/nginx/html/index.html" ] livenessProbe: httpGet: path: / port: 80 readinessProbe: tcpSocket: port: 3306 initialDelaySeconds: 3 periodSeconds: 2 timeoutSeconds: 1 successThreshold: 3 failureThreshold: 3 volumeMounts: - name: nginx-data mountPath: /usr/share/nginx/html - name: mysql-container image: mysql:5.7.44 imagePullPolicy: IfNotPresent env : - name: MYSQL_ROOT_PASSWORD value: '123' 2、启动检查 [root@master01 kubernetes]# kubectl apply -f readness-mysql.yml [root@master01 kubernetes]# kubectl get pod readnessprobe-pod NAME READY STATUS RESTARTS AGE readnessprobe-pod 1/2 Running 0 62s 1/2是因为数据库没有写就绪探针,如果写了,就是0/2,数据库的就绪探针就写检测自己的3306端口 等待一会,mysql初始化完成就绪完成 [root@master01 kubernetes]# kubectl get pod readnessprobe-pod NAME READY STATUS RESTARTS AGE readnessprobe-pod 2/2 Running 0 18s [root@master01 kubernetes]# kubectl get svc NAME TYPE CLUSTER-IP EXTERNAL-IP PORT(S) AGE kubernetes ClusterIP 10.1.0.1 <none> 443/TCP 7d10h readnessprobe-service NodePort 10.1.234.20 <none> 80:30001/TCP 52m [root@master01 kubernetes]# curl 10.1.234.20 test k8s 就绪性探针readnessprobe
1
2
3
4
5
6
7
8
9
10
11
12
13
14
15
16
17
18
一:wordpress镜像 在一个POD里启动两个容器 - wordpress - mysql5.7 1.就绪性探针 2.存活性探针 3.启动钩子 4.停止钩子 5.初始化容器 二:尝试 wordpress 启动一个POD MySQL单独启动在一个POD里,如何连接,才能让网站能够正常访问 三:尝试 nginx 和 php环境分开装,部署代码 fastcgi_pass unix://dev/shm/php.sock 一开始是这样子写的fastcgi_pass 127.0.0.1:9000,但是现在要分开安装,就要写内外ip fastcgi_pass 172.16.1.8:9000 测试,上传图片


